Adding a Map to the CNC Site
This guide details the workflow for adding a live map using the Map component on Strapi. The Map component accepts two fields: a Title and ArcGIS Layer ID.

A Map component on Strapi, with the ArcGIS Layer ID (above).
Currently a Map on the City Nature Challenge site can only display a single layer, which is intended to be the participating city list. A CSV or geojson of the participating cities is first uploaded to ArcGIS Online as a Feature Layer. The layer ID of said feature layer is then added to the Map component on Strapi. Below is a more in-depth explanation of that workflow.
Uploading data to ArcGIS Online
New data can be uploaded to ArcGIS Online in the form of a csv, geojson or json file (other formats, such as Excel files may cause formatting issues). This documentation will assume that a csv file will be uploaded.
Currently, there are no required fields for the uploaded csv. However, certain naming conventions are required for the map popup (more below).
Map Popups
Map popups are the information that appears when a point on the map is clicked. The popup is a collection of fields from the uploaded csv.
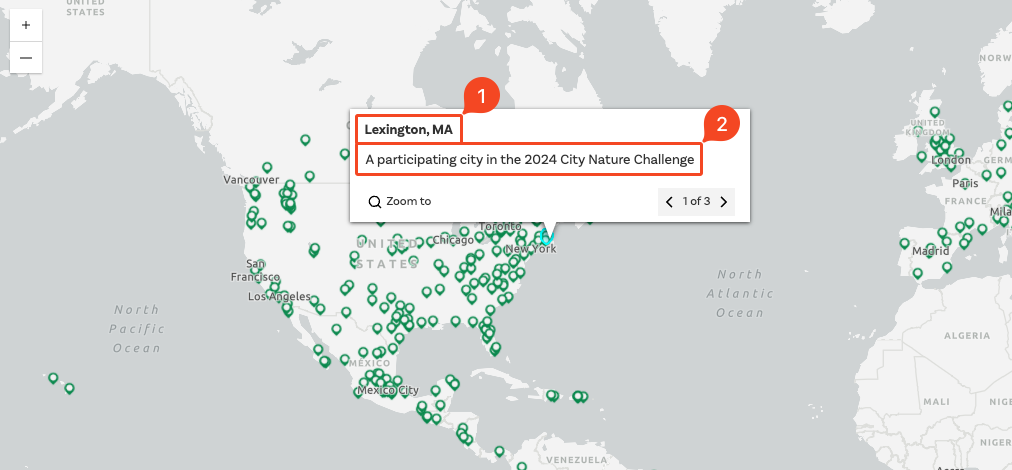
The popup is made up of two fields: title and description.
Title
The title of a popup is rendered at the top of the popup in bolded font (see photo above). It uses values from a field named any of the following:
name, Name, city, City, title, Title, project, Project.
The first field found in the csv with any of the above names will be used as the title of the popup. If none of the above fields are found, the title will be empty. If multiple fields are found, the first one will be used. Therefore if name and project are both found, name will be used as the title.
Description
The description of a popup is rendered below the title. It uses values from a field named any of the following: description , Description, content, Content.
The first field found in the csv with any of the above names will be used as the description of the popup. If none of the above fields are found, the description will be empty. If multiple fields are found, the first one will be used. Therefore if description and content are both found, description will be used as the description.
Creating a new feature layer
Uploading a new city list to ArcGIS Online starts with creating a new feature layer. Below are the steps to do so:
-
Sign into your ArcGIS Online account
-
Open Content > My Content > New item > Your device Select the csv with the new CNC city list
💡Make sure that any csv file uses UTF-8 encoding to ensure that special characters (i.e. "ā" or "ß"), properly display
-
Select the file and click Open
-
Choose Add CSV and create a hosted feature layer
-
Click Next
-
Review the fields and make changes as needed
-
Click Next
-
Choose Latitude and longitude to locate features
-
Click Next
-
Choose a title (such as "City Nature Challenge 2022")
💡The title must be unique across your ArcGIS Online content
-
Choose a folder in My Content to save the item
-
Choose "CNC" in the Assign categories box
-
Click Save
-
Click the Share button (you should a popup similar to the photo below)

-
Set the sharing level to Everyone (public)
-
Click Edit group sharing
-
Select City Nature Challenge and click OK
💡If you do not see City Nature Challenge, ask your ArcGIS Online admin for access to the group
Adding a new Map on Strapi
To add the feature layer you just created on ArcGIS Online as a map on the City Nature Challenge site, you must first create a new Map component on Strapi. When you've done so, you'll can add a Title and will be required to add the feature layer's ID in to the ArcGIS Layer ID field (see below).
The ID of a feature layer can be found by going to its webpage. To go to your feature layer's webpage, follow the steps below:
- Log into your ArcGIS Online account
- Open Content > My Content
- Find your feature layer in the list or search for its name using the search bar at the top
- Click the name of your feature layer (in blue)
You should see your feature layer's webpage similar to the one below:

The ID of your feature layer is accessible via its webpage's URL. ID is the part of the url after the ?id= (see below for an example):
